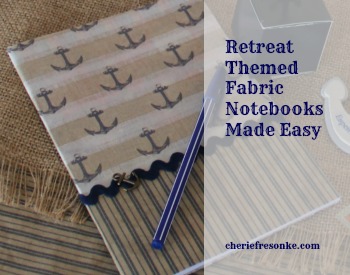
Handmade Fabric Notebooks Are Easier Than You Think

Super Easy Fabric Notebooks to Match Your Retreat Theme
by Cherie Fresonke, @cheriefresonke
Do you want to know how to make cute notebooks for retreat that match your theme? One of my favorite things to do when planning a retreat is to make sure that every gift we give the women matches the theme. It’s my desire that God will speak to the ladies hearts—individually—during the weekend. And more importantly, I want the women to remember what God did in and through their lives at the retreat. So one of the best ways I’ve discovered to accomplish this is by providing nice gifts that match the theme.
[ctt template=”8″ link=”CpO_3″ via=”yes” ]Easy to Make Fabric Themed Notebooks for Your Retreat[/ctt]
Since I host a lot of retreats in Eastern Europe I need to keep the costs to a minimum. No expensive, pre-made, notebooks for us. This is why I discovered a way to make the notebooks ourselves.
The instructions below are for 10 notebooks. To increase the volume just increase it in multiples of ten for ease. Besides, its always nice to have a few extra notebooks to use as gifts later on.
Materials Needed to Make 10 Notebooks
10 Composition Type Notebooks
1/2 yard Fabric (for lower portion of notebook)
1 yard Fabric (for upper portion of notebook)
1 1/2 yards Paper Backed Fusible Web Like Wonder-Under
4 1/2 yards Rickrack or ribbon
10 Buttons or charm
1 Bottle of Fabric Glue
Tools Needed
Scissors
Iron
Instructions for Retreat Themed Notebooks
First:
Cut 10 squares of paper-backed fusible web such as Wonder-Under to be a bit larger than your front and back portion of the notebook. For the standard Composition type notebook cut the ten pieces 16 inches long by 11 inches high. (Standard size of Composition notebook is 7 1/2 inches x 9 3/4 inches.)
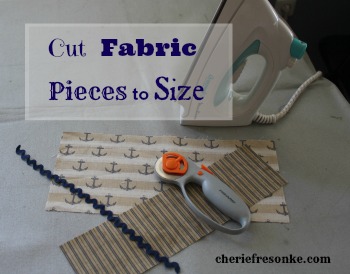
Cut Wonder Under & Fabric Pieces to Size
Second:
Cut 10 rectangles 4 inches by 16 inches for the lower portion (front and back) of the Composition notebooks. (Or cut appropriate size for your notebooks if you are not using the Composition type notebooks.) Cut this out of the 1/2 yard fabric you purchased.
Third:
Cut 10 larger rectangles 7 1/2 inches by 16 inches for the upper portion (front and back) of the notebooks. (Or cut appropriate size for your notebooks if you are not using the Composition type notebooks.) Cut this out of the full yard of fabric you purchased.
Fourth:
Cut 10 strips of rickrack or ribbon the length of 16 inches. (Or again, cut appropriate size for your notebooks if you are not using the Composition type notebooks. Cut it long enough to cover both the front and back.)
Fifth:
Unfold the Composition notebook and lay it open on the table so that the book cover is facing up. Lay the paper-backed fusible web such as Wonder-Under on top with the paper side up, making sure that all portions of the notebook is covered. Iron the Wonder-Under onto the cover according to the fusible web’s instructions. See photo below to see what your notebook will look like after ironing the fusible web to the notebook. In this photo I am just beginning to pull the paper portion away from the ironed-on fusible web. If Wonder-Under scares you here is a short video to encourage you.

Iron Web Side of Wonder Under onto the Notebook
Sixth:
Peel the paper portion of the fusible web such as Wonder-Under away from the notebook. See photo above. If you look closely at the upper right hand corner of the notebook, in the photo you can see the Wonder-Under remains on the notebook once the paper is pulled away.

Peel Away Paper from Wonder Under and Position Fabric
Seventh:
Position the fabric, both upper and lower portion, on the cover of the notebooks. Make sure that the fabric is lying flat and free from wrinkles. (If your fabric pieces are wrinkled iron them flat before this step. Let the fabric cool before placing it on the Wonder-Under-ed notebook or you will have a mess on your hands. Fusible webs such as Wonder-Under are activated by heat. Iron first one side of the notebook, than the other side, making sure that as you wrap the fabric around the notebook the fabric is positioned correctly, as well as, smooth and wrinkle free. See the above photo. If you look closely at the lower right hand corner and bottom of notebook you will see the extra hangover portion of the Wonder-Under. It’s better to have a little extra at this point than to be short. Be sure that the wrong side of fabric goes against the notebook so that the right side of fabric is visible once the notebook is complete. See photo below.
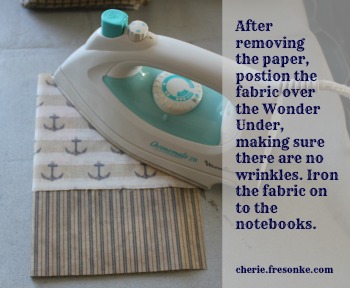
Iron Fabric on to Notebook
Eighth:
Trim the excess fabric to line up with the edge of the notebooks. See photo below.
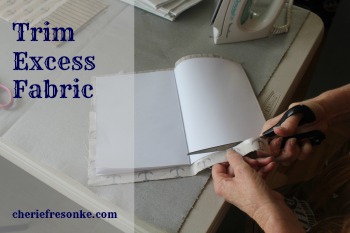
Trim Excess Fabric to Line Up with Edge of Notebook
Ninth:
Glue the rickrack or ribbon in place to hide the rough cut portion of fabric. See two photos below.
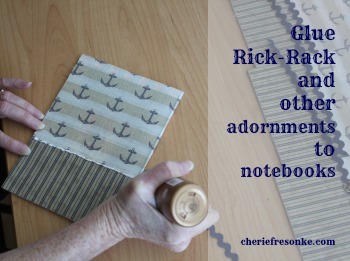
Glue Rick-Rack onto Notebooks to Cover Edge of Both Fabrics
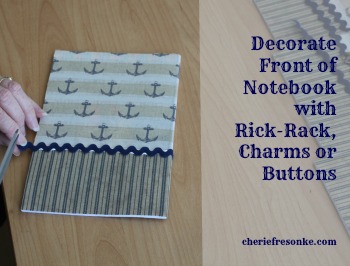
Decorate Notebook with Rick-Rack, Charms or Buttons.
Tenth:
Glue the button or charm on the ribbon to finish off your handmade fabric notebooks.
An Anchor for Your Soul Women’s Retreat
Here are the gifts we provided for the women at our retreat.

An Anchor for Your Soul.
Our Retreat Gifts for the Women. All Handmade. All Loved by the Ladies.
I’m amazed how much these simple gifts touch the women’s hearts. One woman showed me her collection of notebooks from the last four years.
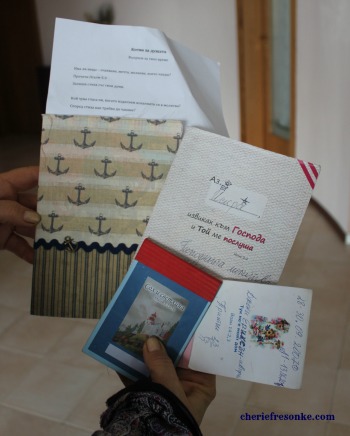
One Woman’s Collection of Retreat Notebooks
Final Thoughts:
Although there are ten steps for the retreat themed notebooks, each step is simple. Just set up an assembly line and you’ll be done before you know it. However, sometimes it’s good to complete one notebook first to make sure you understand all the steps and to make sure your measurements are correct, then put the assembly line into action.
Let me know if you have any questions. I look forward to your comments. Also, please share with me the date and theme of your retreat, and I will pray for your ladies. Enjoy.


